Table of Contents:
Watching films, series and other multimedia materials without the use of physical storage media (e.g. DVD or Blu-ray discs) has become an everyday occurrence. The successive increase in the quality of multimedia available online means that in most cases a fast internet connection and a subscription to one or several streaming services are enough to enjoy the vast repositories of cult productions.
However, there may be a problem when we often use various sources, either free or paid ones – the range of services which are supported natively by our TV set or network media player may be very limited, which makes it difficult to find less popular titles. A media center system based on open source software can be a great solution – in this post we will look at playing movies and series available on Netflix on Raspberry Pi 3.
Raspberry Pi as a media player
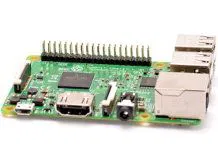
The Raspberry Pi 3 minicomputer – although technologically overtaken by the newer, fourth-generation Raspberry – is still perfectly suited to work as a universal player and, perhaps most importantly, very flexible in terms of configuration.

While the Raspberry Pi 3 Model B version is based on a quad-core ARM Cortex-A53 processor at 1.2GHz, the plus model (RPi 3B+) offers a slightly higher frequency of 1.4GHz. Both models also have the same amount of RAM at their disposal (1 GB), while a significant difference is visible in the type of built-in graphics coprocessor – the 3B uses a Broadcom VideoCore IV clocked at 250 MHz, while the 3B+ boasts a GPU core with a frequency of as much as 400 MHz, which positively affects performance in multimedia applications.
The third generation Raspberry Pi uses single-band 2.4GHz WiFi and a USB-LAN converter with speeds of up to 100Mbit/s, while the Raspberry Pi 3+ has support for dual-band 2.4/5GHz WiFi, and the PHY interface works directly with the processor, allowing the Ethernet port to be classed as a Gigabit Ethernet 10/100/1000 Mbit/s device (although the real speed is limited to 300 Mbit/s the difference can still be clearly felt when transferring large amounts of data).
Netflix on Raspberry Pi 3 – ‘browser-based’ methods
Playing Netflix through a web browser is the simplest option and, interestingly, is still preferred by many users who would rather watch their favourite films and series on a standard PC or, for some reason, don’t currently have access to a Smart TV.

In the case of the Raspberry Pi, it is worth choosing the well-proven Firefox browser which has been very popular for many years now – installing it on a Raspberry Pi is as simple as sudo apt-get install firefox – unlike Linux distributions designed for “large” computers, the Raspberry Pi OS (formerly Raspbian) does not have Firefox installed by default.
On the Raspberry Pi 3, Netflix can also be watched via Chromium, although you may need to install the User-Agent Switcher for Chrome plugin to switch the presentation of the browser type and version in HTTP headers sent to the server.
Media centre and dedicated plug-in for Netflix
A solution that provides some extra graphical elegance while relieving the user of the need to launch a web browser each time on the Raspberry Pi is to use software designed to work as an entertainment centre. Perhaps the most popular package used by fans of Raspberry Pi and other Linux systems is Kodi.
However, it is worth noting that the system itself does not have native support for Netflix – fortunately, the community of developers around Kodi has also taken care of this aspect by creating a suitable add-on. It can be downloaded from the Github repository and easily installed on Raspberry.
Many people will want to go a step further and use a ready-made system image, containing Kodi and turning Raspberry into a ready-made, full-screen software resembling commercial Smart TV applications – the system is available under the name OSMC.
How useful was this post?
Click on a star to rate it!
Average rating 3 / 5. Vote count: 2
No votes so far! Be the first to rate this post.


