Table of Contents:
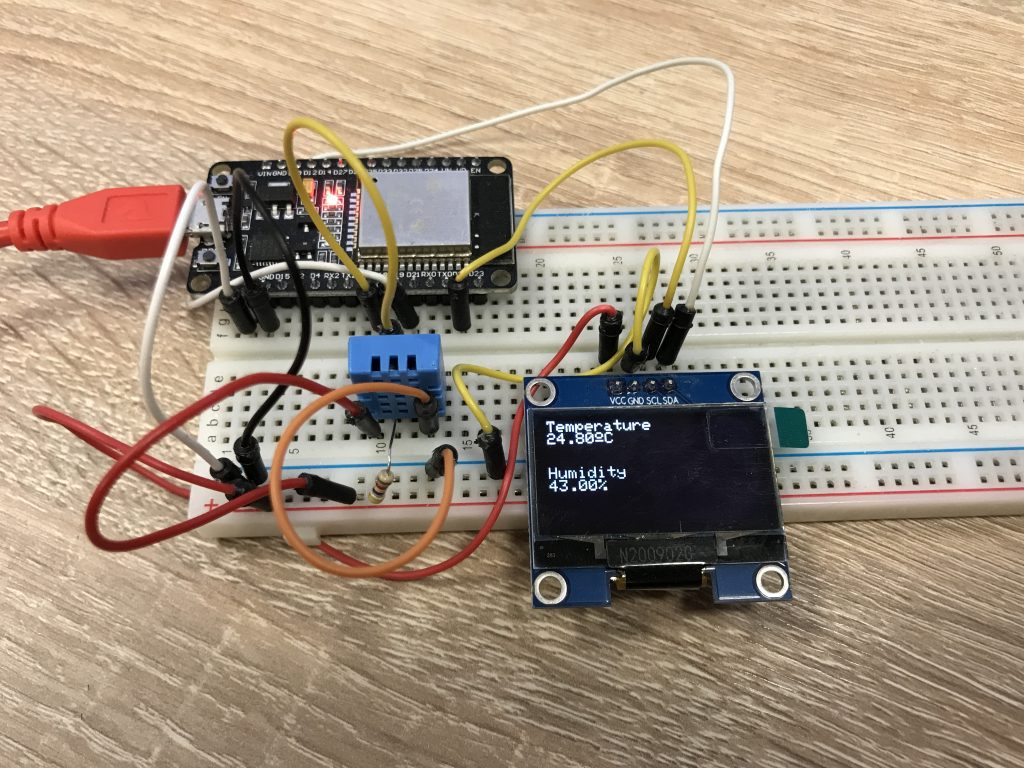
In previous articles, we combined the ESP32 with a simple DS18B20 temperature sensor and an OLED display, which also displayed the data received from the sensor. We also created a simple web server that displayed the data from the temperature sensor. In this tutorial, we will use the knowledge gained in the previous articles and create a project that displays data from the DHT11 temperature and humidity sensor on an OLED display and a web page.
What will you need to create the project?
In order to complete this connection, we will need an ESP32 module, a DHT11 sensor and an OLED display – but you have probably figured as much. All necessary components can be found in a specially prepared kit with the ESP32 module.
The full list of components used is below.
- ESP32 module
- OLED 1.3″ display
- DHT11 sensor
- 4.7 kΩ resistor
- Contact board
- Male-to-male connection wires
- MicroUSB cable
Connecting components to a contact plate
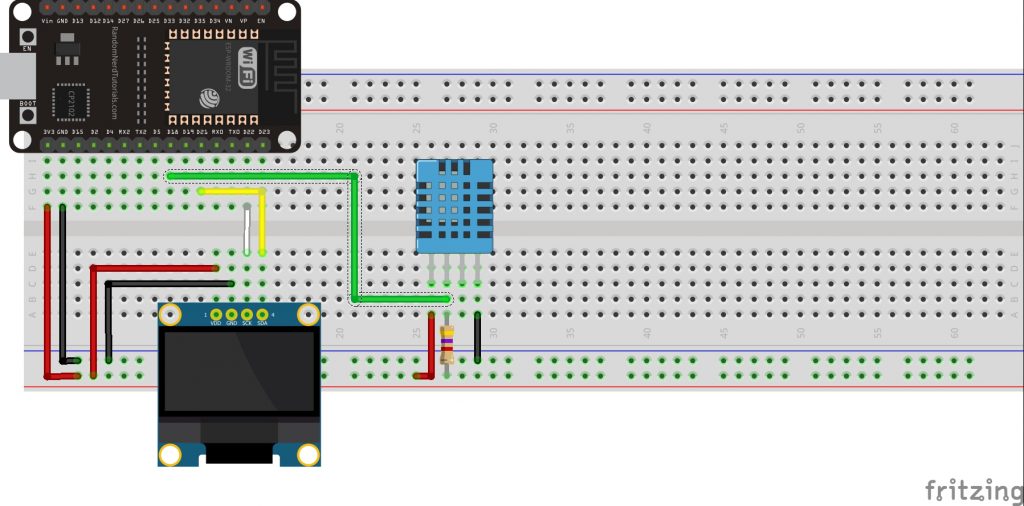
The OLED display uses the I2C interface for communication and was connected to pins 21 (SDA) and 22 (SCK) of the ESP32 module, while the DHT11 sensor was connected to pin 18 using a 4.7 kΩ resistor. Below is a diagram of how the modules are connected to the ESP32.
Required libraries for OLED and DHT11
In order to properly operate the display with the SH1106 controller and the DHT11 sensor, you need to install the appropriate libraries in the Arduino IDE environment. The required libraries can be found at the links:
- https://github.com/nhatuan84/esp32-sh1106-oled
- https://github.com/adafruit/Adafruit-GFX-Library
- https://github.com/adafruit/DHT-sensor-library
Additionally, you will need libraries to create an ESP32 server:
- https://github.com/me-no-dev/ESPAsyncWebServer/archive/master.zip
- https://github.com/me-no-dev/AsyncTCP/archive/master.zip
Downloaded as a .zip package, install the libraries in the Arduino IDE environment.
A window will appear where you search for the location of the downloaded packages, then select the .zip library and select the Open button.
Programming ESP32 module
After properly connecting the modules to the ESP32 and uploading the libraries for the OLED display, DHT11 and ESP32 server. The following code will display data from the DHT11 sensor on the OLED screen and create a simple web server, also with data from the sensor.
Once the code has been correctly uploaded to the ESP32 module, the serial monitor will display the IP address of your ESP32 server and the display will show the measurement data from the sensor.
How useful was this post?
Click on a star to rate it!
Average rating 5 / 5. Vote count: 2
No votes so far! Be the first to rate this post.

