Table of Contents:
In this article we will connect a relay to an ESP32 module and create a lighting control system using an LED. You can also use a standard 230V incandescent bulb, but be careful with this.
What we need to complete the project
For the lighting control project, we will need an ESP32 module, a relay module, and an LED or light bulb. We recommend ESP32 starter kit available at Botland onlne store, as it contains all the necessary components for this and previous projects.
Alternatively, full list of needed products can be completed below:
Connecting components
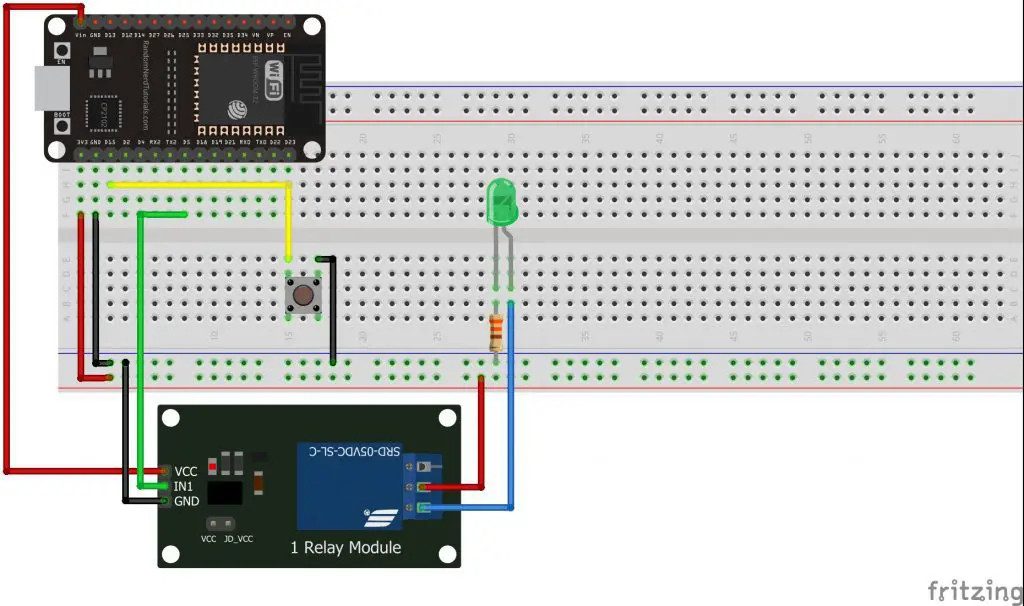
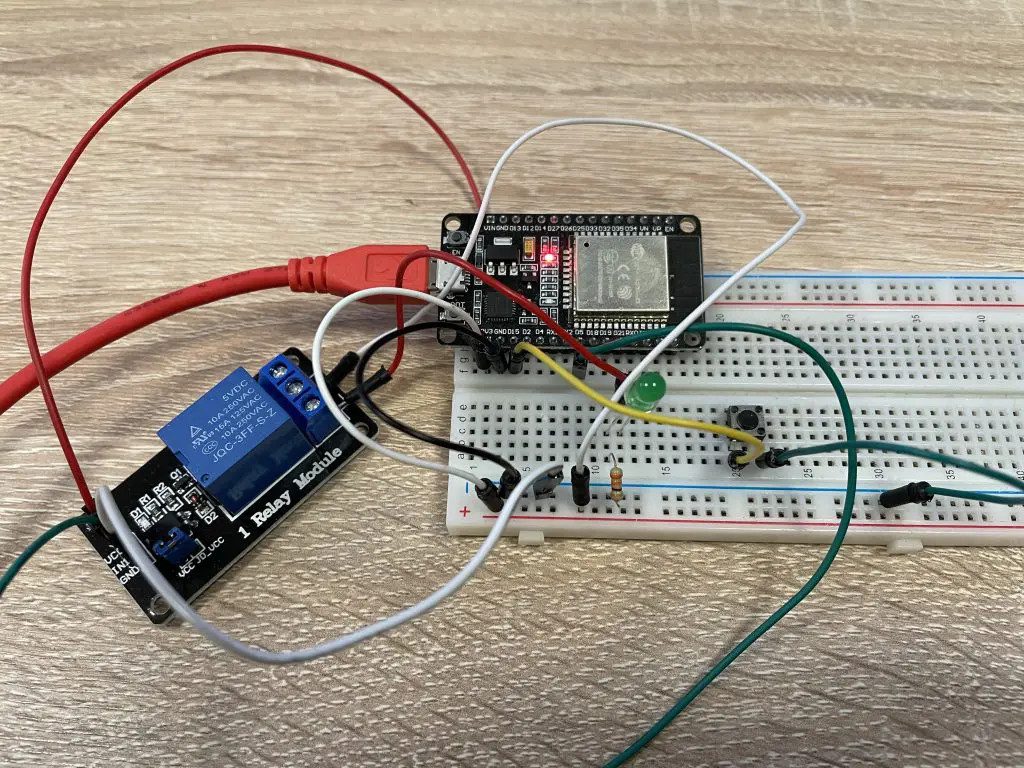
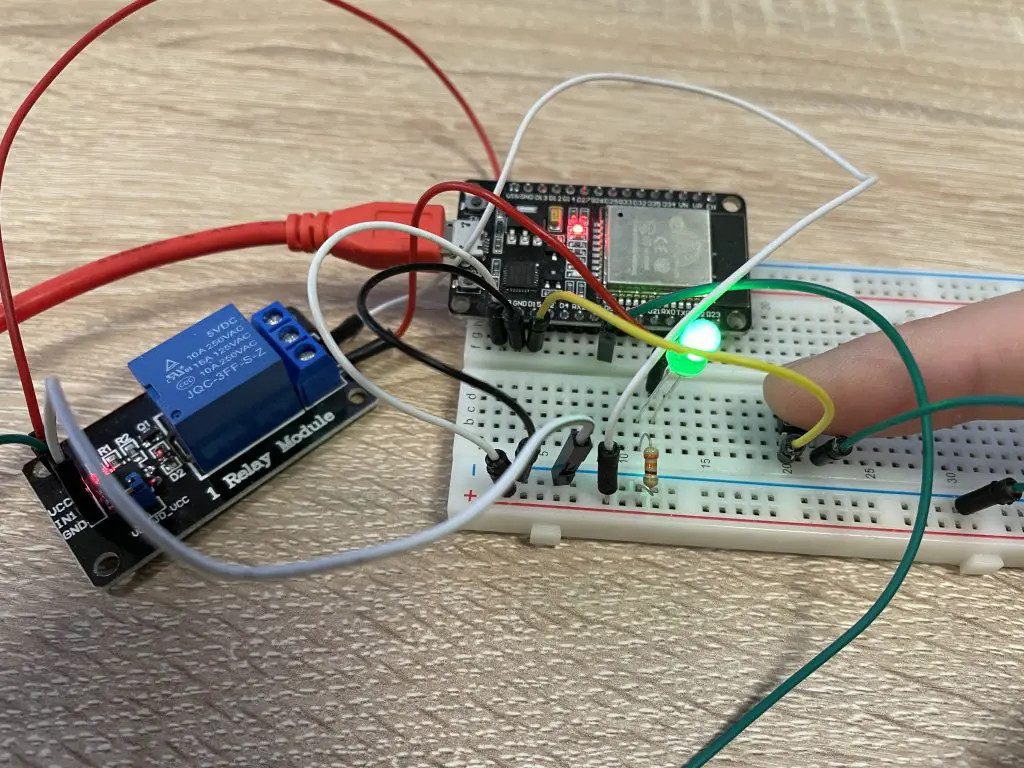
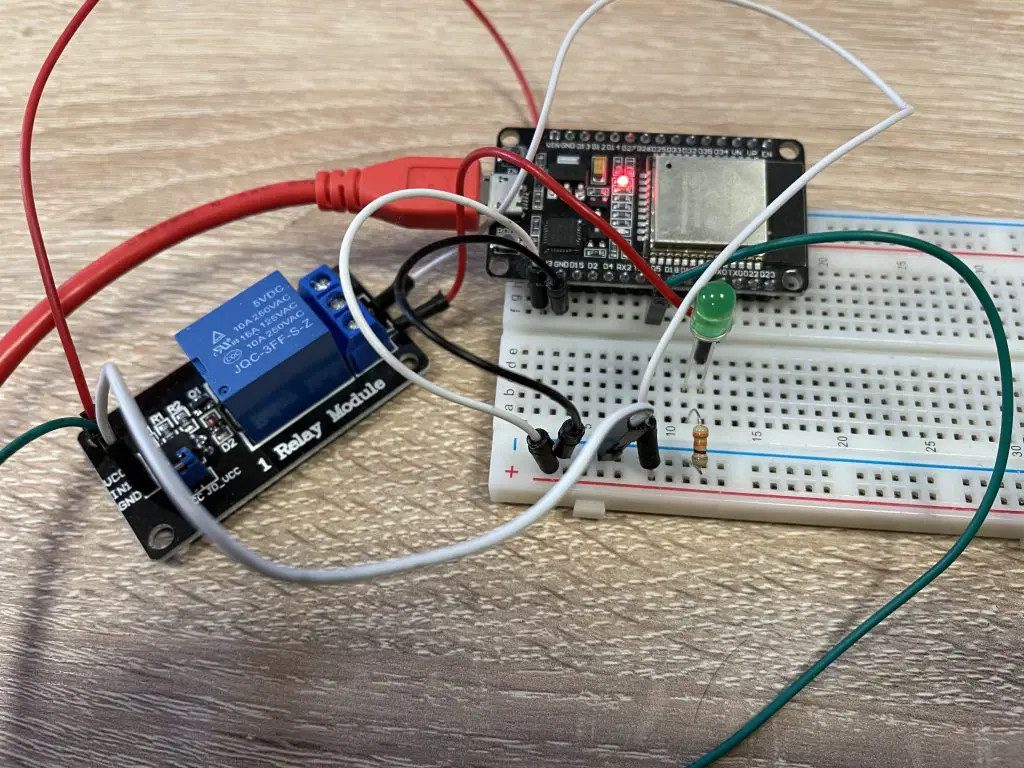
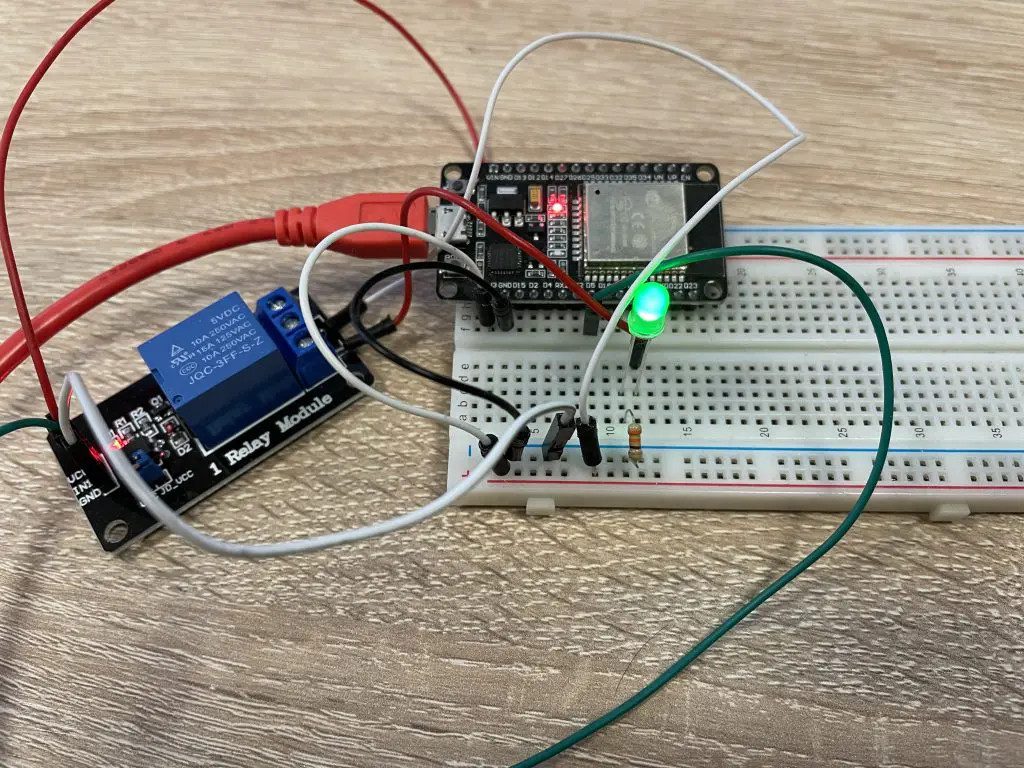
The relay, like PIR motion sensor, cannot be plugged into the contact board. The module was connected to the ESP32 using connection wires. The relay coil is powered by 5 V, so the VCC pin was connected to the VIN pin of the ESP32. In order to run the relay coil from the ESP32 kit, a low state must be given to the IN pin, we will use pin 5 of the ESP32 module. Connect the device you want to power using the relay to the screw connectors, in our case it is an LED whose voltage is connected to the COM and NO pins. The coil of the relay will be switched on when the button connected to pin 15 of the ESP32 module is pressed. A detailed wiring diagram can be found below.
Program for ESP32
					// definiujemy piny, gdzie podłączyliśmy przekaźnik oraz__przycisk
int relay_pin = 5;
int button_pin = 15;

void setup() {
  Serial.begin(115200);
  pinMode(relay_pin, OUTPUT);   // ustawiamy pin przekaźnika jako OUTPUT
  pinMode(button_pin, INPUT_PULLUP);    // ustawiamy pin przycisku jako INPUT_PULLUP
}

void loop() {
  // definiujemy aby stan przycisku odczytywany był cyforowo: wysoki / niski
  int buttonState = digitalRead(button_pin);
  // definiujemy zależność:
  if (buttonState == LOW) { // jeżeli przycisk przejdzie w stan niski
    Serial.println("Przycisk został wciśnięty");
    digitalWrite(relay_pin, LOW);   // przekaźnik załączy się
  }
  else if (buttonState == HIGH) {
    Serial.println("Przycisk został puszczony");
    digitalWrite(relay_pin, HIGH);
  }
}
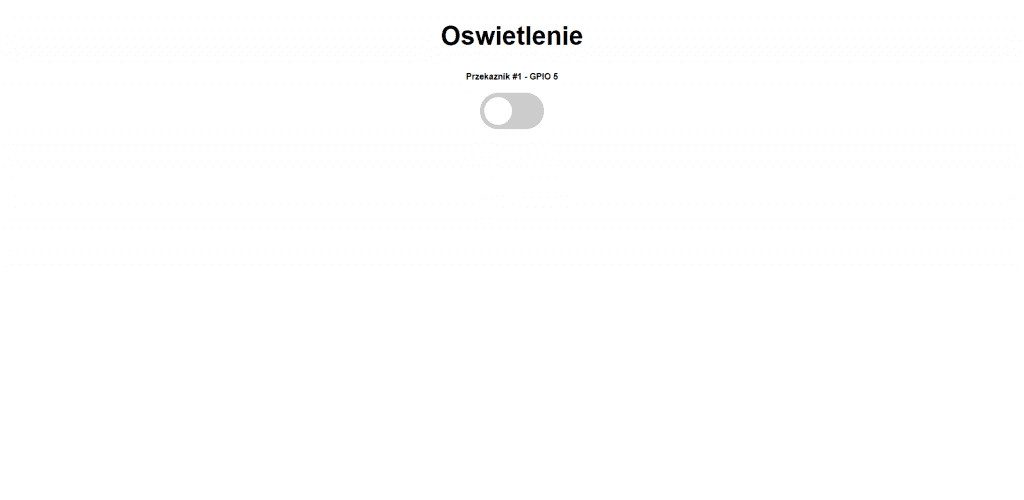
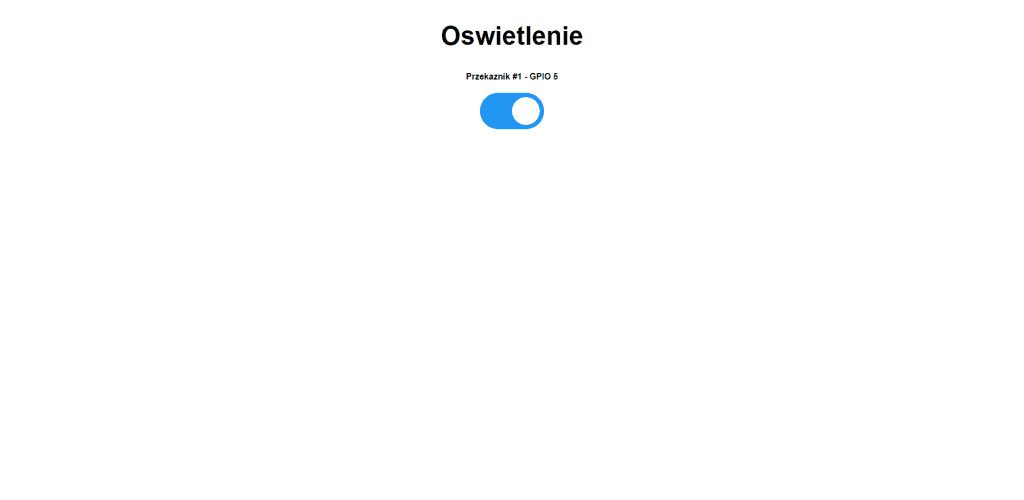
Remote relay control
You can use the ESP32 web server to remotely control the lights using relays. With the following program, you can use any number of relays by changing the number given in the #define NUM_RELAYS line and specify the corresponding pins to which the relays are connected in int relayGPIOs[NUM_RELAYS] = { };.
After loading the program, the local IP address where the server was created will appear in the serial monitor.
https://randomnerdtutorials.com/esp32-esp8266-relay-web-server/

					#include <WiFi.h>
#include <AsyncTCP.h>
#include <ESPAsyncWebServer.h>

//Ustaw wartość true, aby zdefiniować przekaźnik jako normalnie otwarty (NO)
#define RELAY_NO    true

//Ustaw liczbę przekaźników
#define NUM_RELAYS  1

//Przyporządkuj każde GPIO do przekaźnika
int relayGPIOs[NUM_RELAYS] = {5};

const char* ssid = "Twoje_SSID";
const char* password = "Twoje_haslo";

const char* PARAM_INPUT_1 = "relay";
const char* PARAM_INPUT_2 = "state";

//Tworzenie obiektu AsyncWebServer na porcie 80
AsyncWebServer server(80);

const char index_html[] PROGMEM = R"rawliteral(
<!DOCTYPE HTML><html>
<head>
  <meta name="viewport" content="width=device-width, initial-scale=1">
  <style>
    html {font-family: Arial; display: inline-block; text-align: center;}
    h2 {font-size: 3.0rem;}
    p {font-size: 3.0rem;}
    body {max-width: 600px; margin:0px auto; padding-bottom: 25px;}
    .switch {position: relative; display: inline-block; width: 120px; height: 68px}
    .switch input {display: none}
    .slider {position: absolute; top: 0; left: 0; right: 0; bottom: 0; background-color: #ccc; border-radius: 34px}
    .slider:before {position: absolute; content: ""; height: 52px; width: 52px; left: 8px; bottom: 8px; background-color: #fff; -webkit-transition: .4s; transition: .4s; border-radius: 68px}
    input:checked+.slider {background-color: #2196F3}
    input:checked+.slider:before {-webkit-transform: translateX(52px); -ms-transform: translateX(52px); transform: translateX(52px)}
  </style>
</head>
<body>
  <h2><span id="Oswietlenie"><span id="Oswietlenie">Oswietlenie</span></span></h2>
  %BUTTONPLACEHOLDER%
<script>function toggleCheckbox(element) {
  var xhr = new XMLHttpRequest();
  if(element.checked){ xhr.open("GET", "/update?relay="+element.id+"&state=1", true); }
  else { xhr.open("GET", "/update?relay="+element.id+"&state=0", true); }
  xhr.send();
}</script>
<script>class RocketElementorAnimation{constructor(){this.deviceMode=document.createElement("span"),this.deviceMode.id="elementor-device-mode-wpr",this.deviceMode.setAttribute("class","elementor-screen-only"),document.body.appendChild(this.deviceMode)}_detectAnimations(){let t=getComputedStyle(this.deviceMode,":after").content.replace(/"/g,"");this.animationSettingKeys=this._listAnimationSettingsKeys(t),document.querySelectorAll(".elementor-invisible[data-settings]").forEach(t=>{const e=t.getBoundingClientRect();if(e.bottom>=0&&e.top<=window.innerHeight)try{this._animateElement(t)}catch(t){}})}_animateElement(t){const e=JSON.parse(t.dataset.settings),i=e._animation_delay||e.animation_delay||0,n=e[this.animationSettingKeys.find(t=>e[t])];if("none"===n)return void t.classList.remove("elementor-invisible");t.classList.remove(n),this.currentAnimation&&t.classList.remove(this.currentAnimation),this.currentAnimation=n;let s=setTimeout(()=>{t.classList.remove("elementor-invisible"),t.classList.add("animated",n),this._removeAnimationSettings(t,e)},i);window.addEventListener("rocket-startLoading",function(){clearTimeout(s)})}_listAnimationSettingsKeys(t="mobile"){const e=[""];switch(t){case"mobile":e.unshift("_mobile");case"tablet":e.unshift("_tablet");case"desktop":e.unshift("_desktop")}const i=[];return["animation","_animation"].forEach(t=>{e.forEach(e=>{i.push(t+e)})}),i}_removeAnimationSettings(t,e){this._listAnimationSettingsKeys().forEach(t=>delete e[t]),t.dataset.settings=JSON.stringify(e)}static run(){const t=new RocketElementorAnimation;requestAnimationFrame(t._detectAnimations.bind(t))}}document.addEventListener("DOMContentLoaded",RocketElementorAnimation.run);</script><script>(()=>{class RocketElementorPreload{constructor(){this.deviceMode=document.createElement("span"),this.deviceMode.id="elementor-device-mode-wpr",this.deviceMode.setAttribute("class","elementor-screen-only"),document.body.appendChild(this.deviceMode)}t(){let t=getComputedStyle(this.deviceMode,":after").content.replace(/"/g,"");this.animationSettingKeys=this.i(t),document.querySelectorAll(".elementor-invisible[data-settings]").forEach(t=>{const e=t.getBoundingClientRect();if(e.bottom>=0&&e.top<=window.innerHeight)try{this.o(t)}catch(t){}})}o(t){const e=JSON.parse(t.dataset.settings),i=e.m||e.animation_delay||0,n=e[this.animationSettingKeys.find(t=>e[t])];if("none"===n)return void t.classList.remove("elementor-invisible");t.classList.remove(n),this.currentAnimation&&t.classList.remove(this.currentAnimation),this.currentAnimation=n;let o=setTimeout(()=>{t.classList.remove("elementor-invisible"),t.classList.add("animated",n),this.l(t,e)},i);window.addEventListener("rocket-startLoading",function(){clearTimeout(o)})}i(t="mobile"){const e=[""];switch(t){case"mobile":e.unshift("_mobile");case"tablet":e.unshift("_tablet");case"desktop":e.unshift("_desktop")}const i=[];return["animation","_animation"].forEach(t=>{e.forEach(e=>{i.push(t+e)})}),i}l(t,e){this.i().forEach(t=>delete e[t]),t.dataset.settings=JSON.stringify(e)}static run(){const t=new RocketElementorPreload;requestAnimationFrame(t.t.bind(t))}}document.addEventListener("DOMContentLoaded",RocketElementorPreload.run)})();</script></body>
</html>
)rawliteral";

//Zastępuje placeholder sekcją przycisku na twojej stronie internetowej
String processor(const String& var){
  //Serial.println(var);
  if(var == "BUTTONPLACEHOLDER"){
    String buttons ="";
    for(int i=1; i<=NUM_RELAYS; i++){
      String relayStateValue = relayState(i);
      buttons+= "<h4>Przekaznik #" + String(i) + " - GPIO " + relayGPIOs[i-1] + "</h4><label class=\"switch\"><input type=\"checkbox\" onchange=\"toggleCheckbox(this)\" id=\"" + String(i) + "\" "+ relayStateValue +"><span class=\"slider\"></span></label>";
    }
    return buttons;
  }
  return String();
}

String relayState(int numRelay){
  if(RELAY_NO){
    if(digitalRead(relayGPIOs[numRelay-1])){
      return "";
    }
    else {
      return "checked";
    }
  }
  else {
    if(digitalRead(relayGPIOs[numRelay-1])){
      return "checked";
    }
    else {
      return "";
    }
  }
  return "";
}

void setup(){
  Serial.begin(115200);

    // Ustaw wszystkie przekaźniki na wyłączenie przy starcie programu - jeśli ustawione na Normally Open (NO), przekaźnik jest wyłączony, gdy ustawisz przekaźnik na HIGH
  for(int i=1; i<=NUM_RELAYS; i++){
    pinMode(relayGPIOs[i-1], OUTPUT);
    if(RELAY_NO){
      digitalWrite(relayGPIOs[i-1], HIGH);
    }
    else{
      digitalWrite(relayGPIOs[i-1], LOW);
    }
  }

  //Połącz z WiFi
  WiFi.begin(ssid, password);
  while (WiFi.status() != WL_CONNECTED) {
    delay(1000);
    Serial.println("Łączenie z WiFi..");
  }

  //Wyświetl lokalne IP
  Serial.println(WiFi.localIP());

  // Route dla root / web page
  server.on("/", HTTP_GET, [](AsyncWebServerRequest *request){
    request->send_P(200, "text/html", index_html, processor);
  });

  //Wyślij żądanie GET do <ESP_IP>/update?relay=<inputMessage>&state=<inputMessage2>.
  server.on("/update", HTTP_GET, [] (AsyncWebServerRequest *request) {
    String inputMessage;
    String inputParam;
    String inputMessage2;
    String inputParam2;
    //GET input1 value on <ESP_IP>/update?relay=<inputMessage>
    if (request->hasParam(PARAM_INPUT_1) & request->hasParam(PARAM_INPUT_2)) {
      inputMessage = request->getParam(PARAM_INPUT_1)->value();
      inputParam = PARAM_INPUT_1;
      inputMessage2 = request->getParam(PARAM_INPUT_2)->value();
      inputParam2 = PARAM_INPUT_2;
      if(RELAY_NO){
        Serial.print("NO ");
        digitalWrite(relayGPIOs[inputMessage.toInt()-1], !inputMessage2.toInt());
      }
      else{
        Serial.print("NC ");
        digitalWrite(relayGPIOs[inputMessage.toInt()-1], inputMessage2.toInt());
      }
    }
    else {
      inputMessage = "No message sent";
      inputParam = "none";
    }
    Serial.println(inputMessage + inputMessage2);
    request->send(200, "text/plain", "OK");
  });
  // Start server
  server.begin();
}

void loop() {

}
How useful was this post?
Click on a star to rate it!
Average rating 0 / 5. Vote count: 0
No votes so far! Be the first to rate this post.


