Table of Contents:
Ever since the RP2040 chip was introduced, more and more boards and modules with this microcontroller have been created. However, as they have exactly the same heart, why are there so many of them? In this article, we’ll examine the differences and compare the Raspberry Pi Pico and its competition.
Raspberry Pi Pico
The chip around which this article will focus is the popular RP2040. We’ve already written an article about it on our blog, so for more details on it, please click here. This chip can be found in many devices from other manufacturers, integrated with various boards. There are more and more such models and that’s why it’s more and more difficult to find your way around. Admittedly, the parameters of the microcontroller itself remain the same, but individual boards are equipped with different peripherals and have different design, adapted to different tasks.
The chip was originally found in the Raspberry Pi Pico board. It is manufactured in the UK and has become the prototype for off-the-shelf miniature platform projects, as its dimensions are just 51 x 21mm. It has 40 pins, 26 of which are GPIO pins where 3 of them are analogue-to-digital converter (ADC) outputs. It uses a microUSB connector for power and data transfer. On the surface of the board there is one button signed as BOOTSEL, which is used to program it.

To program the board press BOOTSEL button when it is connected to computer. In computer system we will see volume like in case of mass memory device (like pendrive) and we copy program file to it. The board is programmed in C, C++ and MicroPython.
Arduino Nano RP2040
As is well known, the Arduino, which is probably the biggest competition for the Raspberry, is equally popular. However, even such giants can work together and as part of this Arduino has created a module whose heart beats in a raspberry rhythm. The chip is therefore the same as in the Pico model from Raspberry Pi, but in this design it has been combined with additional sensors and connectivity on a single PCB. Interestingly, despite the increased functionality, this board is even smaller than the original – its dimensions are 45 x 18 mm.

The Arduino Nano RP2040 Connect board offers 24 outputs at the user’s disposal: 14 digital, 8 analog and uses a microUSB connector, just like the Rpi Pico. What distinguishes this model from its prototype is much larger available Flash memory, which in case of Arduino board is 16 MB instead of 2 MB. Other elements additional to the Raspberry board are: 6-axis IMU sensors, U-Blox Nina chip for WiFi and Bluetooth communication, as well as microphone and RGB LED. They also differ in power supply. Admittedly, the recommended values in both cases are 5V, but the Arduino board has a much wider power supply range allowing values from 4 to 22V.
Adafruit Feather RP2040
Another example of using the RP2040 chip is the Feather board from Adafruit. This time there are more changes compared to Raspberry. Let’s start with what strikes the eye the most, the connectors. In this case we have 3 of them: USB-C, JST and STEMMA QT.
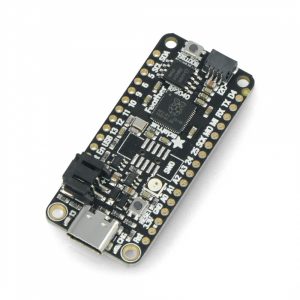
USB of course is used for power and data transfer, the JST connector allows you to connect power from an external battery, the last connector allows you to connect and read information from sensors or devices without soldering. The board has 21 GPIO ports, where 4 are ADC outputs, 16 support PWM modulation and 8 of them are digital outputs. There are 2 buttons on the board – apart from BOOTSEL button there is also one signed as RESET. The board does not have its own EEPROM but an external 8MB memory is included. Board dimensions are 51mm by 23mm, so dimensions are almost identical to its Raspberry prototype.
Adafruit QT Py RP2040
The next item for comparison is the QT Py micro board. Why the micro? Well, at the expense of the number of connectors, the board is truly tiny – it measures less than 22 x 18 mm. Despite this, the board offers a lot of possibilities.
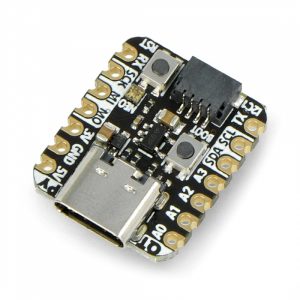
On board STEMMA QT connector, compatible with Grove and Qwiic. The second connector is USB-C. We can power the board with 3.3V and 5V, for which we have special pinouts. As we are talking about pins, there are 13 GPIO ports at our disposal, where each one supports PWM and 4 of them can be used as analog-to-digital converter ports. Besides, two buttons – RESET and BOOT and NeoRGB LED. EEPROM memory is missing, and Flash memory we have only from external QSPI FLASH chip (8 MB standard).
Pimoroni Tiny 2040
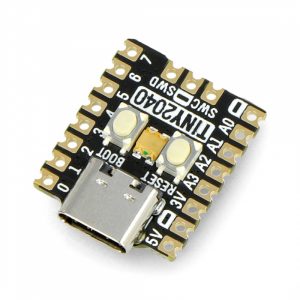
Another tiny board, measuring just 22.9 x 18.2mm, is the Pimoroni Tiny. This tiny board with RP2040 microcontroller offers great prototyping and programming possibilities. There is a USB-C connector on the board that can be used for power, programming and data transfer. Despite the small size, we have 12 GPIO ports available, where 4 support ADC. The board also features a programmable LED and RESET and BOOT buttons. Like the Raspberry, it has 2 MB of QSPI (XiP) flash memory. The allowable voltages for this module are in the range of 3 to 5.5V.
Seeed Xiao RP2040
The board produced by Seeedstudio is another example of using a chip from Raspberry. Like the Pico model, it has 2MB of built-in Flash memory. It is another much smaller board than the protoplast, measuring 20 x 17.5mm.
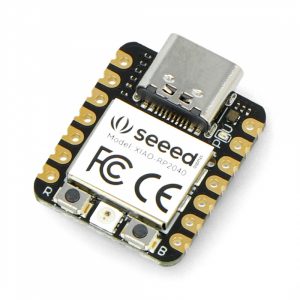
In Xiao RP2040 the GPIO pins are located on the side edges of the board of which we have 11 digital pins, 4 analog pins and 11 pins supporting PWM modulation. The only connector on the board is a USB type C port, which can be used to power and program the module. On the surface of the platform there are two buttons – RESET and BOOT as well as LED diodes: one programmable RGB LED, LED informing about power supply, two status LEDs and one LED of any purpose. We can power this little guy with 3.3 and 5V (by connecting power source to appropriate pins).
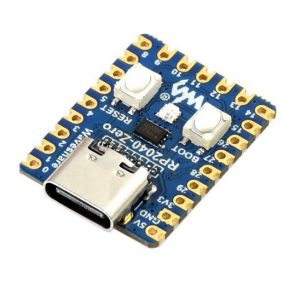
The last representative of the Raspberry chip in today’s compilation is the RP2040-Zero board. The compact hardware platform measures 23.5 by 18 mm and houses as many as 29 GPIO pins around itself, 20 of which are located at its edge. 16 of them support PWM modulation, 4 can be used as A/D converter ports and with 8 special pinouts we will support custom peripherals. At the edge without pins is located the USB-C port, through which it is possible to program and power the board. Other available peripherals are two buttons: BOOT and RESET, an RGB LED and a built-in temperature sensor.
The Summary
As we can see, there are many possibilities for using the RP2040 chip. There are as many options as expected applications, and we have listed the parameters that most distinguish all these hardware platforms so that you can answer the question of which model you should be interested in. Each board model has its own advantages and disadvantages, unique parameters, size, number of available leads, built-in peripherals and of course price, but the final decision is in your hands. However, we hope that this article will make your search at least a little easier.