


Arduino in combination with DS18B20 temperature sensor
This guide shows how to operate the temperature sensor via the Arduino board.
The following elements are used in the example:
Connection
At the beginning the library should be added to Arduino environment (Sketch -> Include Library -> Add .ZIP Library...). Next we connect sensor pins according to the table below:
| Arduino pins | Pin Sensor |
|---|---|
| GND | GND |
| Pin 10 | DQ |
| 5 V | Vdd |
|
In addition, the sensor requires a 4.7 kΩ pull-up resistor between DQ and 5 V power supply - this does not apply to modules that already have this resistor built in. |
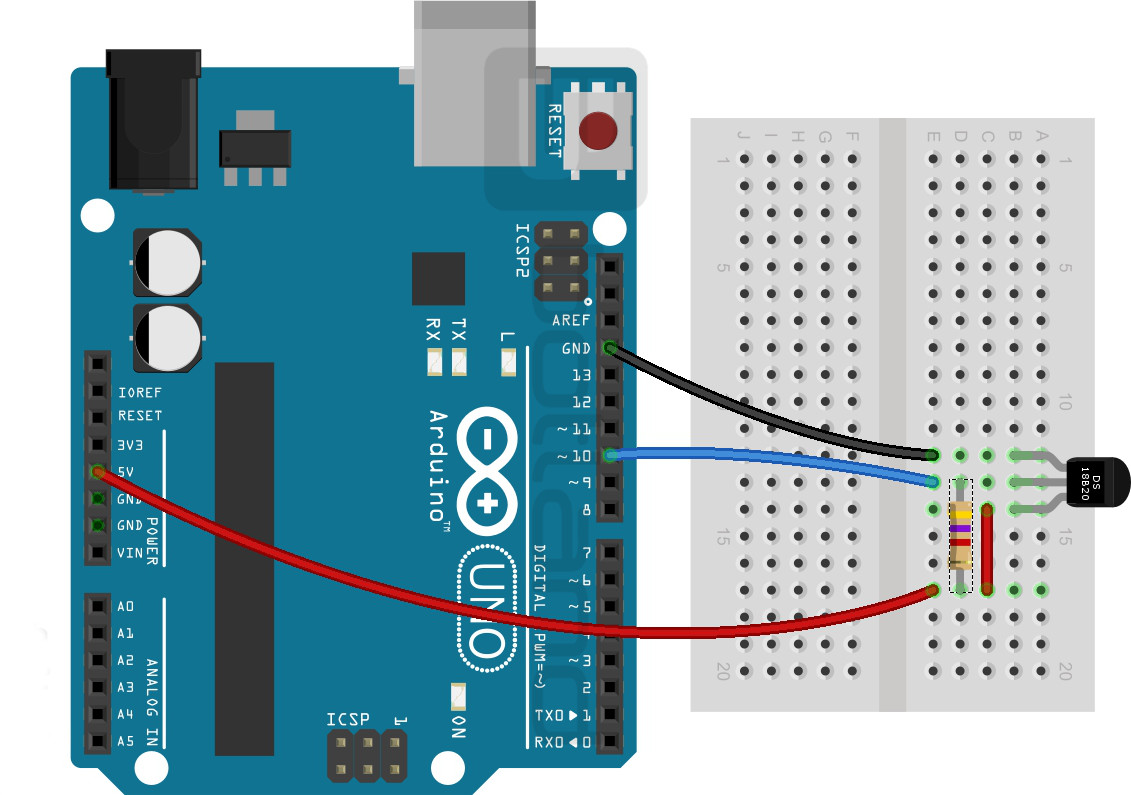
Wiring diagram of the temperature sensor.
Operation
In order to obtain the temperature from the sensor we will use a sample program DS18x20_Temperature from the attached library (File -> Examples -> OneWire -> DS18x20_Temperature).
- // OneWire DS18S20, DS18B20, DS1822 Temperature Example
- //
- // http://www.pjrc.com/teensy/td_libs_OneWire.html
- //
- // The DallasTemperature library can do all this work for you!
- // " http://milesburton.com/Dallas_Temperature_Control_Library
- OneWire ds(10); // on pin 10 (a 4.7K resistor is necessary)
- void setup(void) {
- Serial.begin(9600);
- }
- void loop(void) {
- I was and;
- byte present = 0;
- byte type_s;
- byte date[12];
- byte addr[8];
- float celsius, fahrenheit;
- if ( !ds.search(addr)) {
- Serial.println("No more addresses.")
- Serial.println();
- ds.reset_search();
- delay(250);
- return;
- }
- Serial.print("ROM =");
- for( i = 0; i < 8; i++) {
- Serial.write('');
- Serial.print(addr[i], HEX);
- }
- if (OneWire::crc8(addr, 7) != addr[7]) {
- Serial.println("CRC is not valid!");
- return;
- }
- Serial.println();
- // The first ROM byte indicates which chip
- switch (addr[0]) {
- case 0x10:
- Serial.println(" Chip = DS18S20"); // or old DS1820
- type_s = 1;
- break;
- case 0x28:
- Serial.println(" Chip = DS18B20");
- type_s = 0;
- break;
- case 0x22:
- Serial.println(" Chip = DS1822");
- type_s = 0;
- break;
- default:
- Serial.println("Device is not a DS18x20 family device.");
- return;
- }
- reset();
- ds.select(addr);
- ds.write(0x44, 1); // start conversion, with parasite power on at the end
- delay(1000); // maybe 750ms is enough, maybe not
- // we might do a ds depower here, but the reset will take care of it.
- present = ds.reset();
- ds.select(addr);
- write(0xBE); // Read Scratchpad
- Serial.print(" Data = ");
- Serial.print(present, HEX);
- Serial.print(" ");
- for ( i = 0; i < 9; i++) { // we need 9 bytes
- date[i] = ds.read();
- Serial.print(data[i], HEX);
- Serial.print(" ");
- }
- Serial.print(" CRC=");
- Serial.print(OneWire::crc8(date, 8), HEX);
- Serial.println();
- // " Convert the data to actual temperature
- // because the result is a 16 bit signed integer, it should
- // be stored to an "int16_t" type, which is always 16 bits
- // even when compiled on a 32 bit processor.
- int16_t raw = (date[1] << 8) | date[0];
- if (type_s) {
- raw = raw << 3; // 9 bit resolution default
- if (date[7] == 0x10) {
- // count remain gives full 12 bit resolution
- raw = (raw & 0xFFF0) + 12 - date[6];
- }
- } else {
- byte cfg = (date[4] & 0x60);
- // " at lower res, the low bits are undefined, so let's zero them
- if (cfg == 0x00) raw = raw & ~7; // 9 bit resolution, 93.75 ms
- else if (cfg == 0x20) raw = raw & ~3; // 10 bit res, 187.5 ms
- else if (cfg == 0x40) raw = raw & ~1; // 11 bit res, 375 ms
- //// default is 12 bit resolution, 750 ms conversion time
- }
- celsius = (float)raw / 16.0;
- fahrenheit = celsius * 1.8 + 32.0;
- Serial.print(" Temperature = ");
- Serial.print(celsius);
- Serial.print(" Celsius, ");
- Serial.print(fahrenheit);
- Serial.println(" Fahrenheit");
- }
The effects of the program can be seen on the screen below.
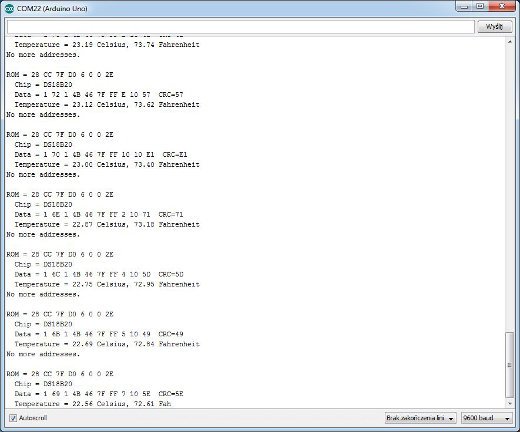
Serial screenshot of the monitor.