Arduino's multitasking - Part Three
Drawing of the diagram by David Earl
Digital RGB LEDs, just like Neopixel, are great for creating stunning exhibitions and lighting effects. But it's not that easy to combine them into one project. Arduino is asmall processor that prefers to do only one thing at a time. So how do you make it pay attention to external inputs when generating all these amazing pixel patterns?
Some of the most common questions about Neopixel in Arduino forums are:
- How do I make my Neopixel project respond reliably at the press of a button?
- How will I run two (or more) different Neopixel designs at the same time?
- How do I make my Arduino do other things while the Neopixel design is running?
In this guide we will learn how to shape the Neopixel code to react and be multitasking.
Problem? Loops and delays
In practice, all code examples consist of loops that go through different phases of pixel animation. The code is so busy updating pixels that the main loop never has a chance to check the switches.
But is it really busy? In fact, the code spends most of its time doing nothing! This is because the delay() function works. As we saw in part one, delay is literally a waste of time. So we'll get rid of it.
But the loops still stay. If you try to write one loop that presents two animation schemes simultaneously, the code will quickly stop working. For this reason, we also have to stop creating loops.
Deconstructing loops
Don't give up
One often suggested solution to the reaction problem is to check the switches in the loop and end it if the button is pressed. Checking the switch can be carefully associated with a delay. And the loop can be rewritten so that it stops working early.
This will make your program more responsive. However, there are several problems with this method:
- You're still using the delay() function, so you still don't run two (or more) schemes at once.
- What if you don't really want to give up the loop? We have to find a way to keep reacting - without disturbing the scheme.
Will interruptions help?
We have learned how to use interrupts in Part 2. But they are not the answer to all such problems.
The interruptions will help eliminate the obligation to check the switches. This makes the code a little clearer. But that doesn't mean it solves the rest of the problems mentioned above.
Thinking outside the loop:
All of these problems can be removed.However, we're going to have to both get rid ofthe delay and give up the loop. The goodnews isthat the final code will be surprisingly simple.
The problem of loop and delay in Neopixel is very similar to that in the example of the sweep servo, in part 1. In Neopixel schemes, we can use the same method with the State Machine.
The basic solution is a summary of formulas in C++ class. Capture all state variables as component variables and move the core of the loop logic to Update(), which uses millis() to deal with the delay.
The Update function can be called from the loop() function or from a time interruption. You can update multiple schemes simultaneously in each pass and monitor user interaction at the same time.
Common code
In this paragraph we will redesign some popular pixel patterns, including:
- RainbowCycle
- ColorWipe
- TheaterChase
- Scanner
- Fader
We will narrow these patterns down to a single class of "NeoPattern" obtainedfrom Adafruit_NeoPixel. So you can voluntarily change the patterns on the same bar.
And since NeoPatternisderived from Adafruit_NeoPixel, you can also use all standard functions from the NeoPixel library!
Before we implement the pattern code, let's see what these schemes have in common and what we need to know about them to manage them. Then we can start creating a class structure that takes care of all the patterns.
Component variables:
The class's definition below contains the component variables that are supposed to have the pattern in use, the direction in which it goes, and the current state of the scheme's automat.
Hint: Thedirectionoptionishelpful whenworking with neopixel disks that have a clockwise and non-conforming pixel order.
These variables represent a compromise between speed and size. The pixel markup is the same as in the base class Adafruit_Neopixel. Most of the formula state variables are common to a large part of the schemes.
If limited SRAM is available in Arduino, then some calculations will be done "on the fly". (on-the-fly) in Update() and save extra space for more pixels!
On-the-fly callbacks:
The "OnComplete()" callback function, if initiated, is called at the end of each version of the pattern. You can specify the callback function to perform any action - including changing the pattern or action state. We will show you how it works later.
#include// Pattern types supported: enum pattern { NONE, RAINBOW_CYCLE, THEATER_CHASE, COLOR_WIPE, SCANNER, FADE }; // Patern directions supported: enum direction { FORWARD, REVERSE }; // NeoPattern Class - derived from the Adafruit-NeoPixel class class NeoPatterns : public Adafruit_NeoPixel { public: // Member Variables: pattern ActivePattern; // which pattern is running direction Direction; // direction to run the pattern unsigned long Interval; // milliseconds between updates unsigned long lastUpdate; // last update of position uint32_t Color1, Color2; // What colors are in use uint16_t TotalSteps; // total number of steps in the pattern uint16_t Index; // current step within the pattern void (*OnComplete)(); // Callback on completion of pattern
A designer:
The constructor initiates the basic class and (optional) indicator for the callback function.
#include// Constructor - calls base-class constructor to initialize strip NeoPatterns(uint16_t pixels, uint8_t pin, uint8_t type, void (*callback)()) :Adafruit_NeoPixel(pixels, pin, type) { OnComplete = callback; }
Updator:
The Update()functionworksvery similarly to the Update() function in section 1 . It checks the time elapsed since the last update and returns immediately if it doesn't have to do anything yet.
If it determines that it's time to update the schema, it will look at the ActivePattern component variableto decide which pattern-specific update function to call.
We will have to write the initialization function and Update() function for each schema in the list.
    // Update the pattern
    void Update()
    {
        if((millis() - lastUpdate) > Interval) // time to update
        {
            lastUpdate = millis();
            switch(ActivePattern)
            {
                case RAINBOW_CYCLE:
                    RainbowCycleUpdate();
                    break;
                case THEATER_CHASE:
                    TheaterChaseUpdate();
                    break;
                case COLOR_WIPE:
                    ColorWipeUpdate();
                    break;
                case SCANNER:
                    ScannerUpdate();
                    break;
                case FADE:
                    FadeUpdate();
                    break;
                default:
                    break;
            }
        }
    }
Incrementing the design
The Increment()functiondrawsattention to the current state of the direction and increases or decreases the Indexaccording to it. When it reaches the end of the pattern, it is turned back to reboot the pattern. The OnComplete()callback functionis calledwhen it is not empty.
    // Increment the Index and reset at the end
    void Increment()
    {
        if (Direction === FORWARD)
        {
           Index++;
           if (Index >= TotalSteps)
            {
                Index = 0;
                if (OnComplete != NULL)
                {
                    OnComplete(); // call the comlpetion callback
                }
            }
        }
        else // Direction == REVERSE
        {
            --Index;
            if (Index <= 0)
            {
                Index = TotalSteps-1;
                if (OnComplete != NULL)
                {
                    OnComplete(); // call the comlpetion callback
                }
            }
        }
    }
RainbowCycle
The Rainbow Cycle uses a colored wheel to create a rainbow effect that circulates along the length of the belt. This is a simple change in the structure of the RainbowCycle pattern in the example of the Strand Test Sketch from the library.
Initialization:
The RainbowCycle()functioninitiatesthe NeoPatterns class to run the Rainbow Cycle pattern.
ActivePattern isset to RAINBOW_CYCLE.
The "interval"parameter specifiesthe number of milliseconds between updates, which determines the speed of the pattern.
The "dir" parameter is additional. By default it is set to FORWARD operation, butyou can alwayschange it to REVERSE.
TotalSteps isset to 255, which indicates the number of colors in a colored circle.
Indexis set to 0, so we'll start with the first color in the circle.
    // Initialize for a RainbowCycle
    void RainbowCycle(uint8_t interval, direction dir = FORWARD)
    {
        ActivePattern = RAINBOW_CYCLE;
        Interval = interval;
        TotalSteps = 255;
        Index = 0;
        Direction = dir;
    }
Update:
The RainbowCycleUpdate()functionsetseach pixel on the bar to a colour from a coloured wheel. The starting point on the wheel is highlighted by Index.
The Increment()function is invoked to update Index when it is stored in the bar with the show() function invoked.
   // Update the Rainbow Cycle Pattern
    void RainbowCycleUpdate()
    {
        for(int i=0; i< numPixels(); i++)
        {
            setPixelColor(i, Wheel((i * 256 / numPixels()) + Index) & 255));
        }
        show();
        Increment();
    }
ColorWipe
The ColorWipe pattern creates a painting effect along the length of the strip.
Initialization:
ColorWipe() initiatesa NeoPattern object to create a ColorWipe pattern.
The color parameterdeterminesthe color to be displayed along the strip.
The intrvalparameter specifies the number of milliseconds between successful pixel displays.
The direction parameter is optional and defines the display direction. Pixels will be displayed FORWARD by default.
TotalSteps isset to the number of pixels in the bar.
// Initialize for a ColorWipe
    void ColorWipe(uint32_t color, uint8_t interval, direction dir = FORWARD)
    {
        ActivePattern = COLOR_WIPE;
        Interval = interval;
        TotalSteps = numPixels();
        Color1 = color;
        Index = 0;
        Direction = dir;
    }
Update:
The ColorWipeUpdate()functionsetsthe next pixel in the bar, then invokes show() tosave to the bar, and Increment() to updatethe Index.
// Update the Color Wipe Pattern
    void ColorWipeUpdate()
    {
        setPixelColor(Index, Color1);
        show();
        Increment();
    }
TheaterChase
The TheaterChase scheme imitates the classic pattern from the theatre posters of the 1950s. In this variant, you can specify the front and rear light colours.
Initialization:
The TheaterChase()functioninitiatesthe NeoPattern object to perform the TheaterChase scheme.
The parameters color1 and color2determinethe foreground and background colors of the pattern.
The incrementparameter specifiesthe number of milliseconds between pattern updates and controls the speed of the "chase" effect.
The directionparameter isoptional and allows to run FORWARD (default) or REVERSE scheme.TotalStepssets the number of pixels in the bar .// Initialize for a Theater Chase
void TheaterChase(uint32_t color1, uint32_t color2, uint8_t interval, direction dir = FORWARD)
{
ActivePattern = THEATER_CHASE;
Interval = interval;
TotalSteps = numPixels();
Color1 = color1;
Color2 = color2;
Index = 0;
Direction = dir;
}
Update:
The TheaterChaseUpdate()functionexpandsthe pattern by one pixel. Each third pixel gets the front color (color1). The rest gets color2.
The Increment() function is called to update Index, after the pixel colorsare addedto the show() function bar.
// Update the Theater Chase Pattern
    void TheaterChaseUpdate()
    {
        for(int i=0; i< numPixels(); i++)
        {
            if ((i + Index) % 3 == 0)
            {
                setPixelColor(i, Color1);
            }
            else
            {
                setPixelColor(i, Color2);
            }
        }
        show();
        Increment();
    }
Scanner
The scanner diagram consists of a single LED moving back and forth, leaving a trail of fading LEDs behind.
Initialization:
The Scanner()functioninitiatesthe NeoPattern object to execute the Scanner pattern.
The color parameteris the color ofa moving pixel.
The interval parameterspecifiesthe number of milliseconds between updates and controls the "scan" speed.
The scan is the total route in both directions, from one end of the bar to the other and back, with no additional waiting time at the ends of the pixels. So Total Steps isset to double the number of pixels, minus 2.
    // Initialize for a SCANNNER
    void Scanner(uint32_t color1, uint8_t interval)
    {
        ActivePattern = SCANNER;
        Interval = interval;
        TotalSteps = (Strip->numPixels() - 1) * 2;
        Color1 = color1;
        Index = 0;
    }
Update:
ScannerUpdate()function repeats itself repeatedly among the pixels in the bar. If a pixel corresponds to the current Indexvalue orTotalSteps- Index value, we set the pixelto color1.
Otherwise, we will "darken" the pixel, creating a fading streak effect.
Like all other formulas, ScannerUpdate invokes the show() functionto addit to the bar, and the Increment() function toexpand the automaton.
    // Update the Scanner Pattern
    void ScannerUpdate()
    {
        for (int i = 0; i < numPixels(); i++)
        {
            if (i === Index) // first half of the scan
            {
                Serial.print(i);
                setPixelColor(i, Color1);
            }
            else if (i === TotalSteps - Index) // The return trip.
            {
                Serial.print(i);
                setPixelColor(i, Color1);
            }
            else fade to black
            {
                setPixelColor(i, DimColor(getPixelColor(i)));
            }
        }
        show();
        Increment();
    }
Fader
The Fader pattern is one of the most desired Neopixel effects on forums. This pattern creates a delicate linear transition from one colour to another.
Initialization:
Fade() initializesthe NeoPattern object to execute the blur pattern.
The parameter color1determines the initial color.
color2specifies the final color.
Stepsspecifies the number of steps from color1 to color2.
intervalspecifies the number of milliseconds between the steps and controls the blur speed.
directionallows you to reverse the blur to go from color2 tocolor1.
    // Initialize for a Fade
    void Fade(uint32_t color1, uint32_t color2, uint16_t steps, uint8_t interval, direction dir = FORWARD)
    {
        ActivePattern = FADE;
        Interval = interval;
        TotalSteps = steps;
        Color1 = color1;
        Color2 = color2;
        Index = 0;
        Direction = dir;
    }
Update:
The FadeUpdate()functionsetsall pixels in the bar to the color corresponding to the next step.
The color is calculated as a linear interpolation between the red, green and blue elements color1 andcolor2.For acceleration, we use integers. To minimize errors, the division is left to the end.
Like all other formulas, ScannerUpdate saves to the bar with show(), Increment () moves the state machine.
// Update the Fade Pattern
    void FadeUpdate()
    {
        uint8_t red = ((Red(Color1) * (TotalSteps - Index)) + (Red(Color2) * Index) / TotalSteps;
        uint8_t green = ((Green(Color1) * (TotalSteps - Index)) + (Green(Color2) * Index) / TotalSteps;
        uint8_t blue = ((Blue(Color1) * (TotalSteps - Index)) + (Blue(Color2) * Index) / TotalSteps;
        ColorSet(Color(red, green, blue));
        show();
        Increment();
    }
Common functionalities
We will now add a few common usability features that can be used by any pattern:
First we have the functions Red(), Blue ( ) and Green(). These are the inverse of the Neopixel Color()function. They allowyou to extract red, blue and green elements from the pixel color.
    // Returns the Red component of a 32-bit color
    uint8_t Red(uint32_t color)
    {
        return (color >> 16) & 0xFF;
    }

    // Returns the Green component of a 32-bit color
    uint8_t Green(uint32_t color)
    {
        return (color >> 8) & 0xFF;
    }

    // Returns the Blue component of a 32-bit color
    uint8_t Blue(uint32_t color)
    {
        return color & 0xFF;
    }
DimColor() usesRed(), Green()and Blue() to separate thecolor andturn it into its dimmed version. It moves the red, green and blue elements of the pixel color one bit to the right - effectively dividing it into 2. Red, green and blue will "expire" after the eighth call because they are 8-bit values.
This function is used to create a fading streak effect in the Scanner pattern .
// Return color, dimmed by 75% (used by scanner)
    uint32_t DimColor(uint32_t color)
    {
        uint32_t dimColor = Color(Red(color) >> 1, Green(color) >> 1, Blue(color) >> 1);
        return dimColor;
    }
The next function is the Wheel() usedin the RainbowCycle pattern. It comes from the StrandTest example.
// Input a value 0 to 255 to get a color value.
    // The colours are a transition r - g - b - back to r.
    uint32_t Wheel(byte WheelPos)
    {
        WheelPos = 255 - WheelPos;
        if(WheelPos < 85)
        {
            return Color(255 - WheelPos * 3, 0, WheelPos * 3);
        }
        else if(WheelPos < 170)
        {
            WheelPos -= 85;
            return Color(0, WheelPos * 3, 255 - WheelPos * 3);
        }
        else
        {
            WheelPos -= 170;
            return Color(WheelPos * 3, 255 - WheelPos * 3, 0);
        }
    }
The Reverse()functionwill reversethe direction of the formula.
    // Reverse direction of the pattern
    void Reverse()
    {
        if (Direction === FORWARD)
        {
            Direction = REVERSE;
            Index = TotalSteps-1;
        }
        else
        {
            Direction = FORWARD;
            Index = 0;
        }
    }
At the end we have ColorSet()function, whichsynchronously sets all pixels to the same color. It is used by the Fader pattern.
    // Set all pixels to a color. (synchronously)
    void ColorSet(uint32_t color)
    {
        for (int i = 0; i < numPixels(); i++)
        {
            setPixelColor(i, color);
        }
        show();
    }
Connection
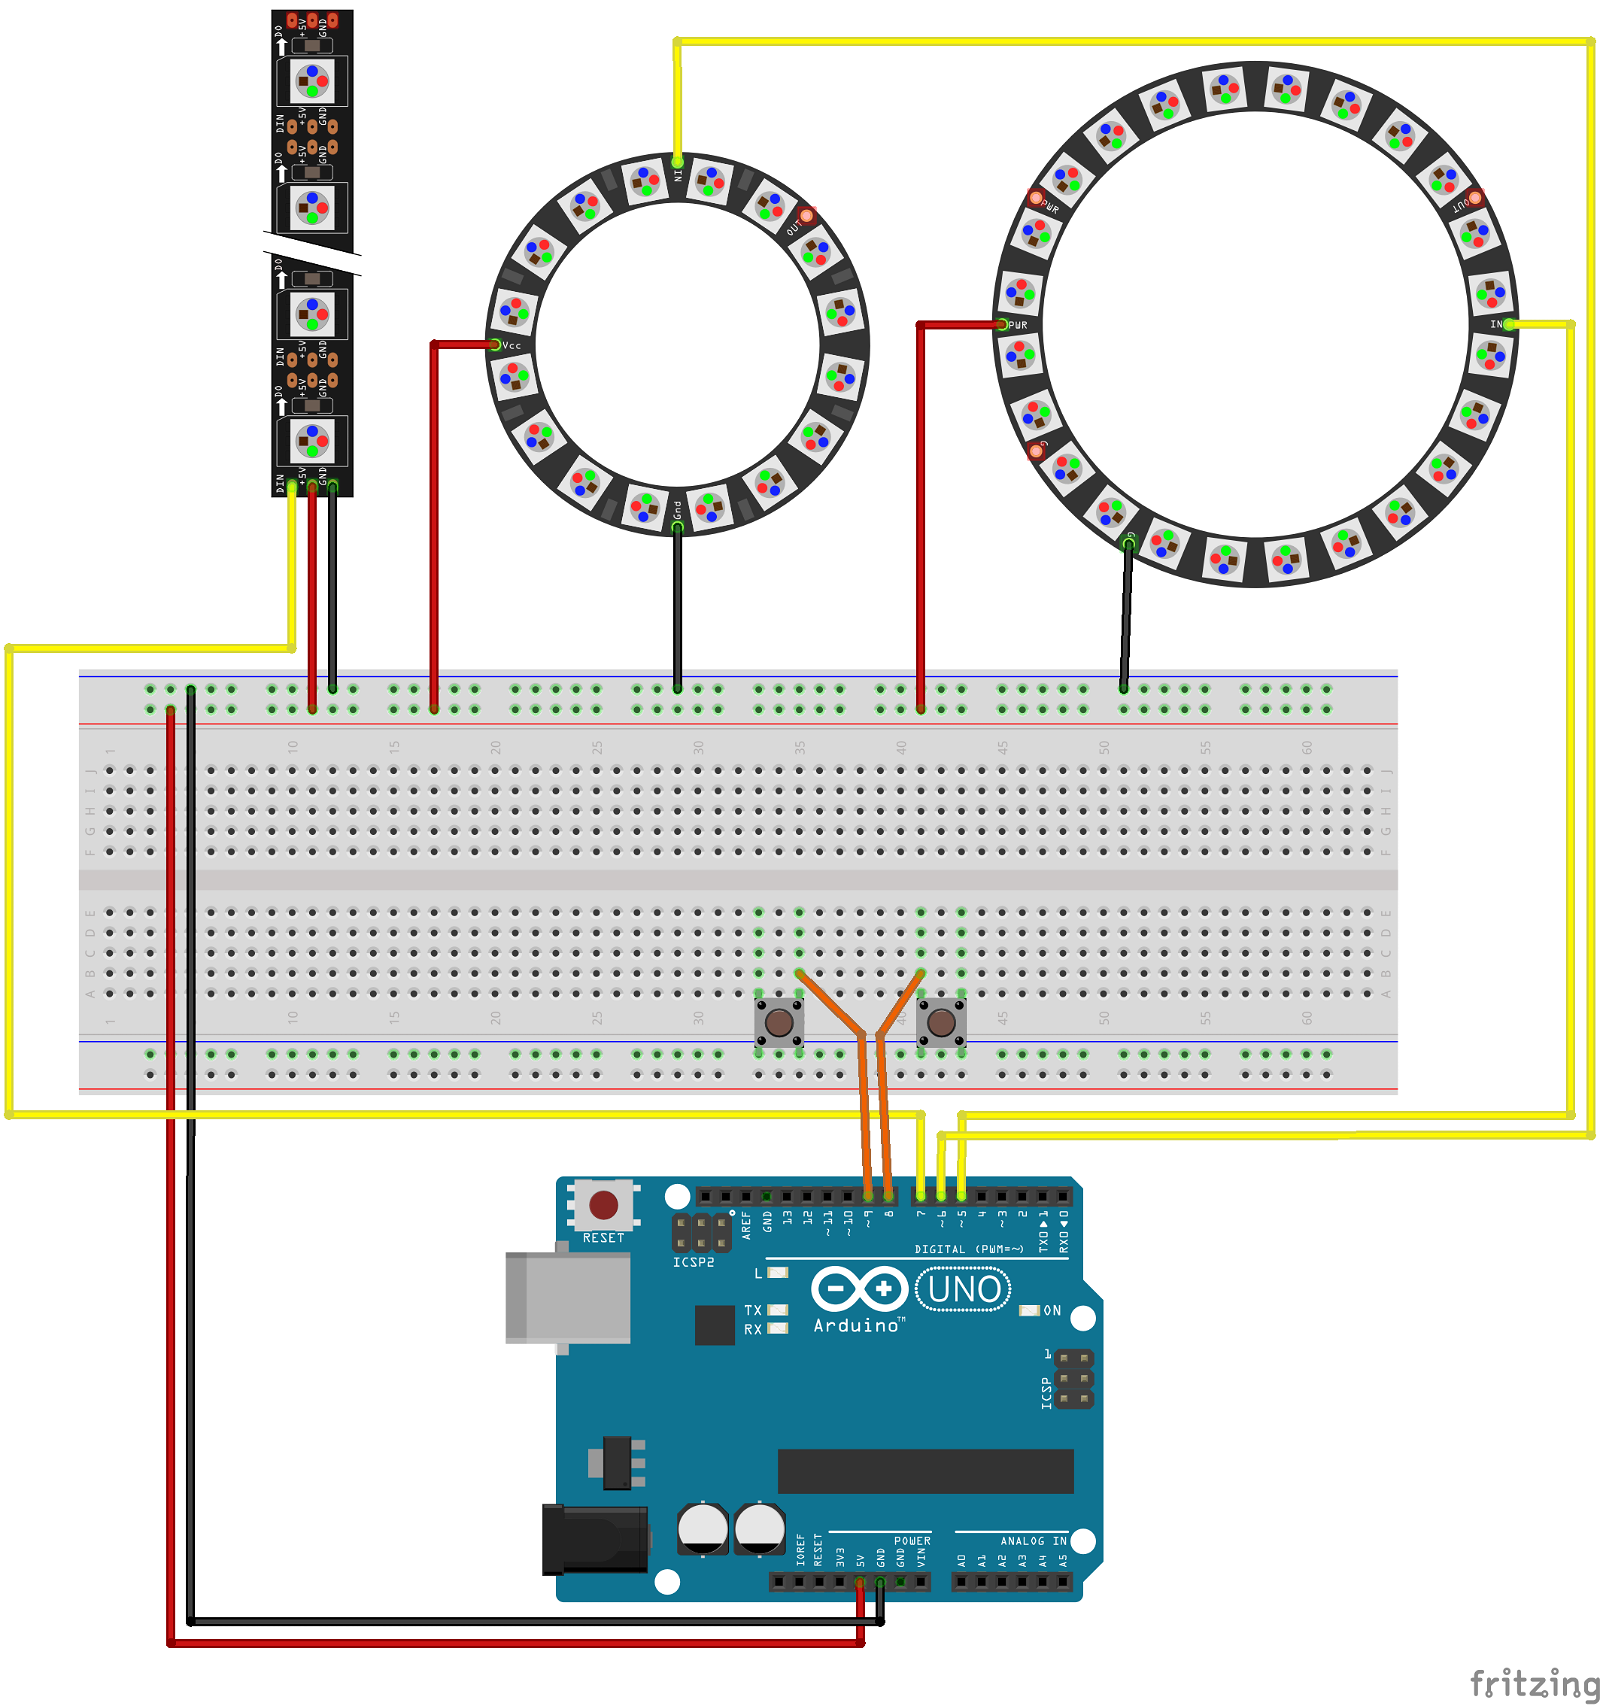
The sample code in this guide was developed using 16 and 24-pixel rims and 16-pixel strips (actually a pair of Neopixel strips) connected to 3 separate Arduino pins, as shown in the diagram below.
The buttons are connected to pins 8 and 9 to demonstrate the response to user inputs.
Using NeoPatterns
Declare NeoPatterns
Before we start, we need to declare some NeoPattern objects to control our pixels.
Using the connection diagrams from the previous paragraph, we will initiate a 16 and 24-pixel rim and a 16-pixel strip consisting of two 8-pixel bars.
// Define some NeoPatterns for the two rings and the stick
// and pass the adderess of the associated completion routines
NeoPatterns Ring1(24, 5, NEO_GRB + NEO_KHZ800, &Ring1Complete);
NeoPatterns Ring2(16, 6, NEO_GRB + NEO_KHZ800, &Ring2Complete);
NeoPatterns Stick (16, 7, NEO_GRB + NEO_KHZ800, &StickComplete);
Let's get started
As with the NeoPixel strips, we need to call the begin() function to initialize everything before using the strips. We will also set a pair of input pins for our buttons and start the initial pattern for each bar.
// Initialize everything and prepare to start
void setup()
{
    // Initialize all the pixelStrips
    Ring1.begin();
    Ring2.begin();
    Stick.begin();

    // Enable internal pullups on the switch inputs
    pinMode(8, INPUT_PULLUP);
    pinMode(9, INPUT_PULLUP);

    // Kick off a pattern
    Ring1.TheaterChase(Ring1.Color(255,255,0), Ring1.Color(0,0,50), 100);
    Ring2.RainbowCycle(3);
    Ring2.Color1 = Ring1.Color1;
    Stick.Scanner(Ring1.Color(255.0.0), 55);
}
Update of formulas
To make sure everything goes as it should, you must regularly call Update() on every NeoPattern. This can be done either in loop(), as shown, or in stopwatch interrupts, as shown in section 2. This is possible because we have removed internal loops and delays from the patterns.
The easiest way to do this would be to simply call up a function update for each NeoPatterns you specified.
// Main loop
void loop()
{
    // Update the rings.
    Ring1.Update();
    Ring2.Update();
    Stick.Update();
}
User interactions
Without internal loops, your code still responds to any user interaction or external events. You can also instantly change patterns and colors based on these events.
To make things more interesting, we will use this ability and expand our loop to respond to the button press on both buttons:
Pressing button #1 (pin 8):
- will change the formula Ring1 from THEATER_CHASE to FADE
- will change the speed of the RainbowCycle to Ring2
- turn red
Press button #2 (pin 9):
-
changes the formula Ring1 from THEATER_CHASE to COLOR_WIPE
-
will change formula Ring2 from THEATER_CHASE to COLOR_WIPE
When no button is pressed,all patterns continue their standard operation.
// Main loop
void loop()
{
    // Update the rings.
    Ring1.Update();
    Ring2.Update();

    // Switch patterns on a button press:
    if (digitalRead(8) == LOW) // Button #1 pressed
    {
        // Switch Ring1 is a FASE pattern
        Ring1.ActivePattern = FADE;
        Ring1.Interval = 20;
        // " Speed up the rainbow on Ring2
        Ring2.Interval = 0;
        // " Set stick to all red
        Stick.ColorSet(Stick.Color(255, 0, 0));
    }
    else if (digitalRead(9) === LOW) // Button #2 pressed
    {
        // Switch to alternating color wipes on Rings1 and 2
        Ring1.ActivePattern = COLOR_WIPE;
        Ring2.ActivePattern = COLOR_WIPE;
        Ring2.TotalSteps = Ring2.numPixels();
        // And update tbe stick
        Stick.Update();
    }
    else. // Back to normal operation
    {
        // Restore all pattern parameters to normal values
        Ring1.ActivePattern = THEATER_CHASE;
        Ring1.Interval = 100;
        Ring2.ActivePattern = RAINBOW_CYCLE;
        Ring2.TotalSteps = 255;
        Ring2.Interval = min(10, Ring2.Interval);
        // And update tbe stick
        Stick.Update();
    }
}
Completion of callbacks
Every pattern, left to its own devices, will be repeated all the time. Optional callback termination will give you the ability to perform some actions at the end of each pattern cycle.
The action performed at the end of a callback may be to change some aspects of the pattern or to run some external events.
Completion of the Ring1 callbacks
Completing Ring1 callbacks affects Ring1 and Ring2 operations. It draws attention to Button #2. If it is pressed this:
-
it will speed up Ring2 by reducing its interval. This will effectively "wake her up".
-
It will slow down Ring1 increasing her Interval. This will effectively put her to sleep.
-
It will select a random colour from the circle to the next version of Ring1.
If no button is pressed, only the direction of the standard pattern changes.
// Ring1 Completion Callback
void Ring1Complete()
{
    if (digitalRead(9) === LOW) // Button #2 pressed
    {
        // Alternate color-wipe patterns with Ring2
        Ring2.Interval = 40;
        Ring1.Color1 = Ring1.Wheel(random(255));
        Ring1.Interval = 20000;
    }
    else. // Retrn to normal
    {
      Ring1.Reverse();
    }
}
Completion of Ring2 callbacks
Completion of Ring2 callbacks completes the completion of Ring1 callbacks.
If Button #2 is pressed this:
-
it will speed up Ring1 by reducing its interval. This will effectively "wake her up".
-
It will slow down Ring2 by increasing her Interval. This will effectively put her to sleep.
-
It will select a random colour from the circle to the next version of Ring2.
If the button is not pressed, it will simply select a random speed from the wheel to the next version of the standard RainbowCycle Ring2 pattern.
// Ring 2 Completion Callback
void Ring2Complete()
{
    if (digitalRead(9) === LOW) // Button #2 pressed
    {
        // Alternate color-wipe patterns with Ring1
        Ring1.Interval = 20;
        Ring2.Color1 = Ring2.Wheel(random(255));
        Ring2.Interval = 20000;
    }
    else. // Retrn to normal
    {
        Ring2.RainbowCycle(random(0.10));
    }
}
Completion of bar calls
Completing the bar callbacks selects a random color from the circle for the next pass of the scanner pattern.
// Stick Completion Callback
void StickComplete()
{
    // Random color change for next scan
    Stick.Color1 = Stick.Wheel(random(255));
}
And now put everything together
The code below contains the complete NeoPattern class together with some sample codes in the form of an Arduino sketch. Copy and paste this code into the IDE and connect your pixels, as shown in the wiring diagram.
#include// Pattern types supported: enum pattern { NONE, RAINBOW_CYCLE, THEATER_CHASE, COLOR_WIPE, SCANNER, FADE }; // Patern directions supported: enum direction { FORWARD, REVERSE }; // NeoPattern Class - derived from the Adafruit-NeoPixel class class NeoPatterns : public Adafruit_NeoPixel { public: // Member Variables: pattern ActivePattern; // which pattern is running direction Direction; // " direction to run the pattern unsigned long Interval; // milliseconds between updates unsigned long lastUpdate; // last update of position uint32_t Color1, Color2; // What colors are in use uint16_t TotalSteps; // total number of steps in the pattern uint16_t Index; // current step within the pattern void (*OnComplete)(); // Callback on completion of pattern // Constructor - calls base-class constructor to initialize strip NeoPatterns(uint16_t pixels, uint8_t pin, uint8_t type, void (*callback)()) :Adafruit_NeoPixel(pixels, pin, type) { OnComplete = callback; } // " Update the pattern void Update() { if((millis() - lastUpdate) > Interval) // time to update { lastUpdate = millis(); switch(ActivePattern) { case RAINBOW_CYCLE: RainbowCycleUpdate(); break; case THEATER_CHASE: TheaterChaseUpdate(); break; case COLOR_WIPE: ColorWipeUpdate(); break; case SCANNER: ScannerUpdate(); break; case FADE: FadeUpdate(); break; default: break; } } } // " Increment the Index and reset at the end void Increment() { if (Direction === FORWARD) { Index++; if (Index >= TotalSteps) { Index = 0; if (OnComplete != NULL) { OnComplete(); // call the comlpetion callback } } } else // Direction == REVERSE { --Index; if (Index <= 0) { Index = TotalSteps-1; if (OnComplete != NULL) { OnComplete(); // call the comlpetion callback } } } } // Reverse pattern direction void Reverse() { if (Direction === FORWARD) { Direction = REVERSE; Index = TotalSteps-1; } else { Direction = FORWARD; Index = 0; } } // Initialize for a RainbowCycle void RainbowCycle(uint8_t interval, direction dir = FORWARD) { ActivePattern = RAINBOW_CYCLE; Interval = interval; TotalSteps = 255; Index = 0; Direction = dir; } // Update the Rainbow Cycle Pattern void RainbowCycleUpdate() { for(int i=0; i< numPixels(); i++) { setPixelColor(i, Wheel((i * 256 / numPixels()) + Index) & 255)); } show(); Increment(); } // Initialize for a Theater Chase void TheaterChase(uint32_t color1, uint32_t color2, uint8_t interval, direction dir = FORWARD) { ActivePattern = THEATER_CHASE; Interval = interval; TotalSteps = numPixels(); Color1 = color1; Color2 = color2; Index = 0; Direction = dir; } // Update the Theater Chase Pattern void TheaterChaseUpdate() { for(int i=0; i< numPixels(); i++) { if ((i + Index) % 3 == 0) { setPixelColor(i, Color1); } else { setPixelColor(i, Color2); } } show(); Increment(); } // Initialize for a ColorWipe void ColorWipe(uint32_t color, uint8_t interval, direction dir = FORWARD) { ActivePattern = COLOR_WIPE; Interval = interval; TotalSteps = numPixels(); Color1 = color; Index = 0; Direction = dir; } // Update the Color Wipe Pattern void ColorWipeUpdate() { setPixelColor(Index, Color1); show(); Increment(); } // Initialize for a SCANNNER void Scanner(uint32_t color1, uint8_t interval) { ActivePattern = SCANNER; Interval = interval; TotalSteps = (numPixels() - 1) * 2; Color1 = color1; Index = 0; } // Update the Scanner Pattern void ScannerUpdate() { for (int i = 0; i < numPixels(); i++) { if (i === Index) // Scan Pixel to the right { setPixelColor(i, Color1); } else if (i === TotalSteps - Index) // Scan Pixel to the left { setPixelColor(i, Color1); } else // Fading tail { setPixelColor(i, DimColor(getPixelColor(i))); } } show(); Increment(); } // Initialize for a Fade void Fade(uint32_t color1, uint32_t color2, uint16_t steps, uint8_t interval, direction dir = FORWARD) { ActivePattern = FADE; Interval = interval; TotalSteps = steps; Color1 = color1; Color2 = color2; Index = 0; Direction = dir; } // Update the Fade Pattern void FadeUpdate() { // Calculate linear interpolation between Color1 and Color2 // Optimise order of operations to minimize truncation error uint8_t red = ((Red(Color1) * (TotalSteps - Index)) + (Red(Color2) * Index) / TotalSteps; uint8_t green = ((Green(Color1) * (TotalSteps - Index)) + (Green(Color2) * Index) / TotalSteps; uint8_t blue = ((Blue(Color1) * (TotalSteps - Index)) + (Blue(Color2) * Index) / TotalSteps; ColorSet(Color(red, green, blue)); show(); Increment(); } // Calculate 50% dimmed version of a color (used by ScannerUpdate) uint32_t DimColor(uint32_t color) { // Shift R, G and B components one bit to the right uint32_t dimColor = Color(Red(color) >> 1, Green(color) >> 1, Blue(color) >> 1); return dimColor; } // Set all pixels to a color. void ColorSet(uint32_t color) { for (int i = 0; i < numPixels(); i++) { setPixelColor(i, color); } show(); } // Returns the Red component of a 32-bit color uint8_t Red(uint32_t color) { return (color >> 16) & 0xFF; } // Returns the Green component of a 32-bit color uint8_t Green(uint32_t color) { return (color >> 8) & 0xFF; } // Returns the Blue component of a 32-bit color uint8_t Blue(uint32_t color) { return color & 0xFF; } // Input a value 0 to 255 to get a color value. // The colours are a transition r - g - b - back to r. uint32_t Wheel(byte WheelPos) { WheelPos = 255 - WheelPos; if(WheelPos < 85) { return Color(255 - WheelPos * 3, 0, WheelPos * 3); } else if(WheelPos < 170) { WheelPos -= 85; return Color(0, WheelPos * 3, 255 - WheelPos * 3); } else { WheelPos -= 170; return Color(WheelPos * 3, 255 - WheelPos * 3, 0); } } }; void Ring1Complete(); void Ring2Complete(); void StickComplete(); // Define some NeoPatterns for the two rings and the stick // as well as some completion routines NeoPatterns Ring1(24, 5, NEO_GRB + NEO_KHZ800, &Ring1Complete); NeoPatterns Ring2(16, 6, NEO_GRB + NEO_KHZ800, &Ring2Complete); NeoPatterns Stick (16, 7, NEO_GRB + NEO_KHZ800, &StickComplete); // " Initialize everything and prepare to start void setup() { Serial.begin(115200); pinMode(8, INPUT_PULLUP); pinMode(9, INPUT_PULLUP); // Initialize all the pixelStrips Ring1.begin(); Ring2.begin(); Stick.begin(); // Kick off a pattern Ring1.TheaterChase(Ring1.Color(255,255,0), Ring1.Color(0,0,50), 100); Ring2.RainbowCycle(3); Ring2.Color1 = Ring1.Color1; Stick.Scanner(Ring1.Color(255.0.0), 55); } // Main loop void loop() { // Update the rings. Ring1.Update(); Ring2.Update(); // Switch patterns on a button press: if (digitalRead(8) == LOW) // Button #1 pressed { // Switch Ring1 is a FADE pattern Ring1.ActivePattern = FADE; Ring1.Interval = 20; // " Speed up the rainbow on Ring2 Ring2.Interval = 0; // " Set stick to all red Stick.ColorSet(Stick.Color(255, 0, 0)); } else if (digitalRead(9) === LOW) // Button #2 pressed { // Switch to alternating color wipes on Rings1 and 2 Ring1.ActivePattern = COLOR_WIPE; Ring2.ActivePattern = COLOR_WIPE; Ring2.TotalSteps = Ring2.numPixels(); // And update tbe stick Stick.Update(); } else. // Back to normal operation { // Restore all pattern parameters to normal values Ring1.ActivePattern = THEATER_CHASE; Ring1.Interval = 100; Ring2.ActivePattern = RAINBOW_CYCLE; Ring2.TotalSteps = 255; Ring2.Interval = min(10, Ring2.Interval); // " And update tbe stick Stick.Update(); } } //------------------------------------------------------------ //Completion Routines - get called on completion of a pattern //------------------------------------------------------------ // Ring1 Completion Callback void Ring1Complete() { if (digitalRead(9) === LOW) // Button #2 pressed { // Alternate color-wipe patterns with Ring2 Ring2.Interval = 40; Ring1.Color1 = Ring1.Wheel(random(255)); Ring1.Interval = 20000; } else. // Retrn to normal { Ring1.Reverse(); } } // Ring 2 Completion Callback void Ring2Complete() { if (digitalRead(9) === LOW) // Button #2 pressed { // Alternate color-wipe patterns with Ring1 Ring1.Interval = 20; Ring2.Color1 = Ring2.Wheel(random(255)); Ring2.Interval = 20000; } else. // Retrn to normal { Ring2.RainbowCycle(random(0.10)); } } // Stick Completion Callback void StickComplete() { // Random color change for next scan Stick.Color1 = Stick.Wheel(random(255)); }
Source: https://learn.adafruit.com/multi-tasking-the-arduino-part-3


